The NAO Robot V6 is easily one of the world’s smartest robots and arguably the most powerful STEAM solution you’ll find on the Eduporium store. This humanoid robot comes with a huge array of educational and experimental value and it's ready to use right out of the box whether educators purchase a used NAO robot or a brand-new model. To that end, one of the NAO's most impressive features remains its built-in object recognition software.
This technology helps the robot develop its own digital registry of objects it has seen and also helps the NAO learn to identify them by name. In this edition of the Eduporium Experiment, we’ll explore the capabilities of the NAO’s object recognition software. Since it's typically high school or college students who will be using this technology with the NAO, we'll also clarify how it differentiates the various items students show it.
Materials for NAO Robot experiment:
- NAO V6 robot.
- Computer with Choregraphe software installed.
- A small figurine.
- A pair of scissors.
- Two coffee mugs with different designs on them.

First, complete setting up the NAO Robot and connect it to a computer that has the Choregraphe software installed. Start by powering on the robot and letting it boot up. Once turned on, pair your robot with the computer using its built-in Wi-Fi network. Then, once it's up and running, you can begin the process of pairing it with Choregraphe. This graphical interface is the key to exploring all of the NAO’s many functions.
We’ll mostly be focused on using the cameras in the NAO’s head, but you could also use Choregraphe to give the robot a command to complete upon successful object recognition. This could be as simple as a wave or as complex as assigning names to each recognized object and having the NAO discuss them.
Getting started with the NAO Robot and Choregraphe.
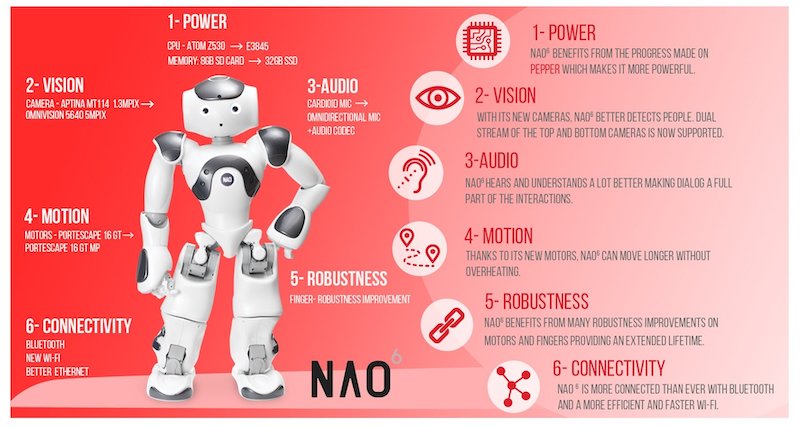
Once your NAO robot is connected to the Choregraphe software, click on the “Video Monitor” tab in the “View” dropdown. The video panel will then appear on the screen and display what the NAO robot is seeing through its cameras. These two cameras essentially give the NAO 3D vision, which helps it determine the shapes of objects. They also provide resolution of 1,280 x 960 at 30 frames per second.
The video monitor panel has buttons on the top bar, which students can use to tell the robot what to do with the objects that appear in its line of vision. If a face crosses into the NAO’s field of vision, for example, you might see a blue cross appear over that face on the screen. This is the NAO robot’s way of being able to discern different faces. It actually measures the distance between a person’s eyes, eyebrows, their mouth, and their nose, specifically—and uses a similar process for identifying other objects.
Teachers can try having different students stand in front of the NAO while others watch on the screen. One quick experiment to conduct is asking them if the blue cross shapes are different for each person who stands in the view of the camera—even when they’re standing next to someone else. This is good for reinforcing how computer vision works—by comparing points of interest on objects in a 3D space. Robots equipped with good computer vision, like the NAO, can recognize groups of objects but may struggle with individual objects.
Experiment Method:
1. Start by preparing your figurine for scanning by placing it on a surface in front of the NAO's eyes.
2. Click the “Learn” button within Choregraphe, which is denoted by the blue teacher icon. A 4-second countdown will start, giving students time to present an object for the NAO to recognize.
3. Once the countdown hits zero, the image will switch to QVGA resolution and it is captured. This pseudo-3D image is what the NAO robot uses to attempt to categorize this item in the future.

4. The Choregraphe software provides an option to click to draw, segment by segment, the contour of the object students want the NAO robot to learn. It's almost as if they were using a magnet tool in a drawing program. They can then click around the important sections of the item to highlight them and continue from there.
5. Once students completely enclose their figurine, a pop-up box appears and they can name and categorize their figure. If their image and tracing is high enough in quality, the NAO robot will accept it as part of its database. If it doesn’t accept the image, students can certainly retry this process until they're successful.
6. Once the NAO has accepted the image as viewable, students must click the button that says “send current vision recognition database to NAO.” This green button is found at the top right of the screen. The video feed will close and the NAO will be able to identify that particular figurine when asked to.
The next steps.
Now, reopening the video monitor should lead to the NAO labeling the figurine the way that students titled it. If done correctly, a small outline with its name will appear around the object. Next, students can check to see if the NAO can track the object's movement by turning the figurine around. Once it's back in the same position, the NAO should be able to reacquire the figurine and recognize it! If they have time, students can also try scanning the back or sides of the figurine and test how it responds to seeing those, too.
For experimental purposes, teachers should also be prepared to assist students as they do this. This is often done with simple guiding questions, including 'Where does the NAO’s effective field of vision end?' Students can also try moving the item away from the NAO or from side to side. When the outline on the screen disappears, the NAO has lost vision of the item.

Once students have tried these different approaches, they can repeat the same steps using the scissors. It's important for them to keep the scissors in the closed position while scanning. Once the NAO has acquired the scissors, they can perform the same observations as before using the video monitor. The main point of adding this wrinkle is to determine if the NAO is able to track the scissors once they’ve been opened into the cutting position.
Using the NAO's object recognition functionality.
Students can also try re-scanning the scissors using the above steps—this time carefully tracing around the two handles while drawing their point-by-point outline. They should determine if the NAO robot is still able to identify the scissors even when they’re opened. Next, students can try the same experiment using the different mugs. Again, they should determine if the NAO is able to tell the difference between the two mugs. Teachers can ask them how they think the NAO identifies objects without a human drawing their outline.
Also, if you can think of any other items that would be good for this experiment, drop some suggestions in the comment box below! By answering these questions and making observations, students can learn about the point-tracking system the NAO robot uses to identify objects in its field of view. Now, when they begin using the NAO to track items in their projects, they’ll be able to choose items that the NAO has previously identified with its machine learning software.
To learn more about the NAO Robot, check out some of our other blogs or visit our store. Besides using the robot's object recognition capabilities, there's truly so much more students can do with the NAO and Choregraphe software. If you have questions about the NAO robot, making a school purchase, or creating a quote, please get in touch. Be sure to follow us on Twitter and Instagram as well so you don't miss any EdTech news and updates.